7 steps to increase your productivity with TO 3000 3D
Owing a license of TO 3000 3D, I kept struggling with its tools and numerous options that were not all that clear to me. Project management, databases, reports, accounting…
Finally, I decided to study the Help section and some reviews to make a guide and start using Translation Office 3000 most extensively in my workflow. Here is a list of tips and tricks that might make your management tasks a bit easier, too.
1. Take time to consider basic settings
– Set your working currencies and adjust the base currency if needed (Backstage > Business Settings > Currencies). The 3D version of TO 3000 auto-updates rates and you can swiftly convert from one currency to another.
– Set a clear service structure. Note that you can add optional groups of services (like translation from or to various languages). Or can just add services one by one without grouping by clicking the New button. (Backstage > Business Settings > Groups of Services or Services).
– Create a client database. I did it manually but it can be imported from previous TO versions. In TO 3000 3D you can add social media links to clients’ profiles for a cooler look.
– Choose your workflow mode. It can be a two-level structure Client – Client Job where each client has Client Jobs attached to it (my choice). Or you can set Client – Project – Client Job structure to group jobs into projects. In this case, you cannot create client jobs directly. This can be changed later but know your mode as it affects the workflow. (See Help > Workflow Modes.)
2. Set up the folder structure you need
TO3000 3D creates and maintains a file storage folder structure in the Business folder. By default, it’s in the root of the C:\ drive. To specify a different location:
- Click Advanced Settings in the Backstage view
- Click the Folders section
- Click the Change button.
Note that you cannot change the database location at the time of installation.
Make use of the folder structure created automatically by TO 3000 for clients, projects and invoices to store additional client-related data. You can easily customize the default structure. To define subfolders to be created automatically with the parent folder, go to Advanced Settings > Folders.
A new option of TO 3000 3D is the Knowledgebase to keep your CVs, TMs, dictionaries, glossaries, guides and manuals. The base has a dedicated folder where you can store all your reference files (by default, it’s C:\Business\KB).To create a subfolder, right click any existing folder in the tree view and select New Folder.

3. Customise your invoice and quote templates
To access all the templates in RTF format (price lists, invoices, quotes, etc.), use Backstage > Business Settings > Templates. Note that you can have several templates and choose any from a drop-down Templates list when issuing an invoice or a quote.
You can use your own invoice and quote template if you have them. First, save your files as RTFs and copy them to the Templates folder. Note that your original document does not contain any variables to add information automatically. The second step is to add variables from your default templates.
After creating a template-based document, you can email it using Mail Sender button (no need to open your main email client). When clicking the button, the Send Mail window opens where you can select your own email template, edit any of the fields or attach more files. To display sent emails both in your main email client and in TO 3000, you should use the IMAP protocol.
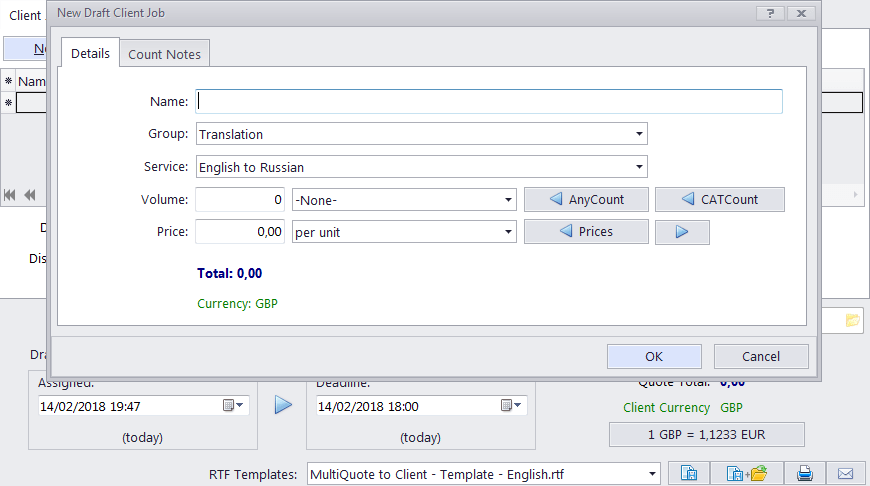
4. Automate your volume count
AnyCount and CATcount options are helpful for generating quotes and creating new jobs. AnyCount calculates text volumes for one or several files (words, characters with and without spaces, lines, pages, custom units). The tool works with all most common file formats. To specify its settings, go to the AnyCount tab in the User Settings window. Coupled with CATCount, it offers estimates for your new projects.
CATCount button opens the corresponding window where you enter word counts for different match types and the agreed rates manually to see the resulting number in the Volume field. (Not sure I’ll ever use this but still.)
When you use AnyCount or CATcount, the calculated data is added to the Notes tab. Please be aware that according to some reviews, CATcount’s result is less for about 0.05% when compared to manual calculations.
5. Synchronise your databases
You do not need another license to run Translation Office 3000 3D on several computer. Here are the steps to synchronize TO 3000 on all your PCs and notebooks.
1) Install TO on all devices
2) Set up cloud synchronization software account (DropBox, GoogleDrive, etc.) or log in
3) Turn synchronization off
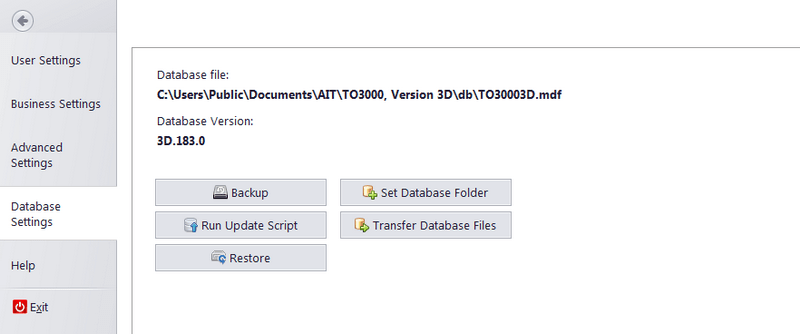
4) Go to Settings > Database. Click Transfer Database button and select your cloud folder. Proceed with every computer you plan to synchronise (be sure to choose the same cloud folder).
5) Turn cloud synchronization on.
Here you can also set the backup path for your manual backups. (No scheduling option is provided so don’t forget to set up a reminder.)
6. Track and find information
Use the Dashboard to track your current projects and deadlines for invoices and jobs. The Dashboard tab has all the key numbers presented in customizable widgets. To see the detailed data, left-click the widget. You can add new widgets to the Dashboard using the widget ribbon above and group widgets by dragging them to the right side of the screen.
The new Global Search function supports the search across the entire database. Search results are displayed in two separate tabs for people (clients, contacts, prospects) and objects (projects, jobs, invoices, etc.). Double click the result to switch to the original data table. Use filters to make search results lists shorter.
Hotkeys will further enhance your navigation and basic operations. To use hotkeys in TO 3000 3D, press <Alt> and the first character of the command name (underlined in the user interface).

7. Analyse and monitor trends
Get a larger picture of your translation business with advanced reports. Choose a static template in the Reports section with Clients, Jobs, Invoices, Payments categories. For certain templates, you need to define conditions (information to be added) and time periods.
Or go to the 3D tab with customizable dynamic reports where you can drag and drop fields in the pivot table to quickly create an exportable report.
And a final tip. When looking into TO 3000 options, I found a useful video. The webinar covers an older version of TO 3000 but it still gives some valuable insights.
Good luck with managing your data!
![]()